Exposing parameters using ParameterPorts
While you can set a node's property using the Pipeline Designer application, you can also easily do so over the Neuropype API using the ParameterPort node. Besides allowing you to set these parameters from your own application through calls to the Neuropype API (see the Developer docs for details on how to use the Neuropype API), parameters set using ParameterPort nodes will also be exposed in the Neuropype Control Panel, accessible from the Neuropype menu (in the Windows taskbar; see page on running multiple pipelines for details.
Adding a ParameterPort node to a pipeline
To use the ParameterPort node, drop it into your pipeline canvas with Pipeline Designer, and wire it to the node whose property you want to expose as a parameter. When the window pops up to connect the two nodes, connect the value property on the ParameterPort node to the property of the other node, i.e., the filename property of the ImportXDF node. (Note that when connecting two nodes, most nodes will default to the data port, which is almost always not the one you want to set the ParameterPort to. So you'll need to deselect that connection and connect to the appropriate port instead.)
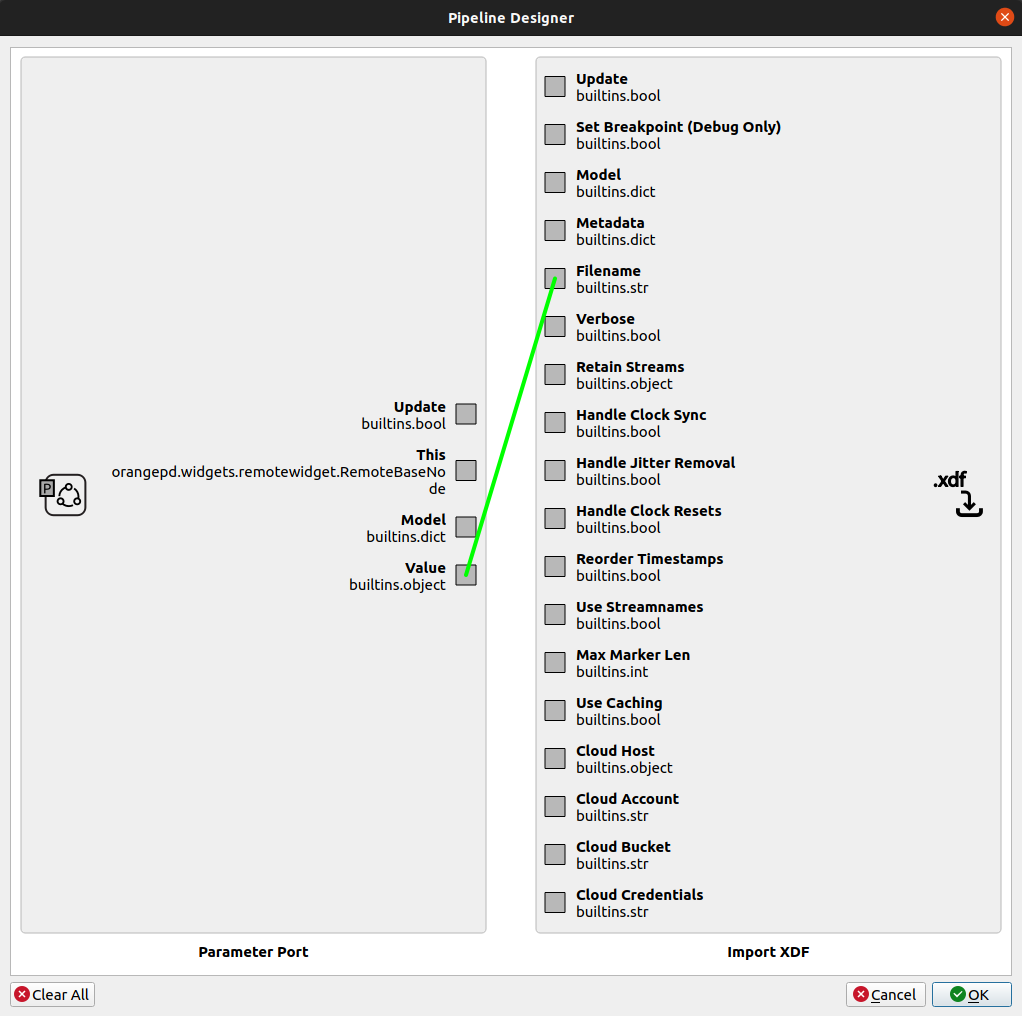
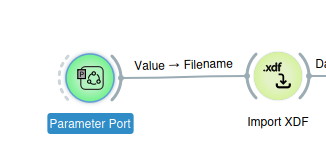
The connected ports will be reflected in the edge connecting the two nodes (here we see the value property connects to the filename property):
When setting the properties of the ParameterPort node, there are three that are most important:
* internal_name: this is the name by which the node it identified over the Neuropype API; it should be unique within your pipeline.
* value (shown as Default value): the default value; if this property is empty, then the default value of the property to which the ParameterPort is connected (in this case, the filename property of the ImportXDF node) will be retained (in other words, it will not overwrite the node property to which it is wired).
* value_type: the type of the value. This must match the value type of the node property to which you are wiring. You can see a node's property types in the node's documentation, as well as in the window to connect 2 nodes (in this example, we see that the filename is of type builtins.str; you can ignore the builtins. portion and str means string.) Supported types are: string same as str, int (integer), list, dict (python dictionary), bool (boolean, i.e., True/False), and some other more specialized types including an all-purpose object type.
* description: an optional text description, which would be returned by the Neuropype API when querying your pipeline (and shown in Pipeline Designer), purely for informational purposes.
* is_filename: if the value is to be a file path, as in our example, check this box to ensure that the path is normalized; otherwise it can be left unchecked.
* The other properties are optional and/or for expert use only, and you can mostly leave them as is.
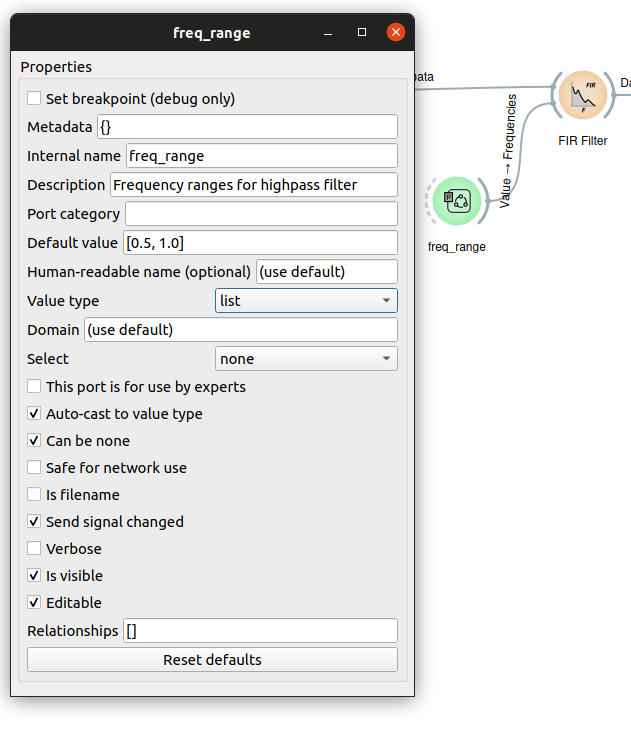
As mentioned above, it's important that the value_type matches the expected type of the node property you're assigned; otherwise a ValueError will be triggered when you try to run your pipeline. In the example below, we can see that the frequencies property of the FIRFilter node takes a list, so if creating a parameter that allow you to change a frequency range before or while running the pipeline, its value_type should be set to list (you can also use list[float] for further validation).
Changing the value of a ParameterPort
Once the ParameterPort is added to your pipeline, you can change its value using three different methods:
* using Pipeline Designer, by double-clicking on the ParameterPort and changing the default value in the node's property window
* using the Neuropype Control Panel, by selecting LAUNCH to launch a pipeline, which will take you to the PARAMETERS page where any ParameterPorts are automatically exposed and can be set
* sending a PATCH request to the pipeline once loaded into memory (a pipeline "execution") using the Neuropype REST API.
Running a pipeline with ParameterPorts
When you run a pipeline, the value from the ParameterPort will be assigned to the node property that it is connected to with every "tick" (pass) of the pipeline. In a large pipeline it can sometimes be easy to forget you have a ParameterPort wired into a node, and then you wonder why nothing happens when you change the property in that node and see no change in the pipeline. So if you change a node property and you wonder why the node behavior doesn't change, check to see if you have a ParameterPort wired into it.
Changing the value of the ParameterPort while the pipeline is running, whether in Pipeline Designer or over the Neuropype API will change the value in the target node and take effect immediately. However, remember that "offline" pipelines will only run through once as the entire dataset is processed in a single pass. So if you have a pipeline that imports a file and processes it, and update the ParameterPort value of the filename after the pipeline has started running, it will have no effect since the pipeline will have already started and the ImportFile node won't be run a second time.
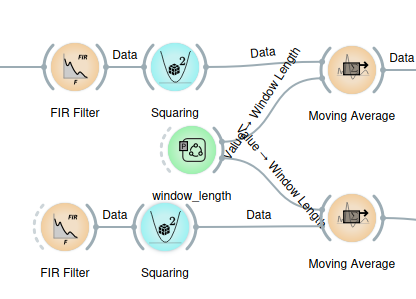
Using ParameterPorts on multiple nodes
One benefit of ParameterPorts is that you can wire them into multiple nodes. This is useful if you have several nodes that should all take the same values (i.e., a window length for multiple MovingWindow nodes in your pipeline). You want to make sure that if you change one you also change the others, and having a ParameterPort wired into them allows you to make the change in only one place and have it apply to them all. This is a useful benefit even if you don't particularly need to expose parameters over the Neuropype API.